I’ve received a plenty useful links to my mail today. By using these links you can download Azure related materials to improve your understanding the process of planning and selling Azure services. There are multiple presentations with different levels (from 50 to 200/300) and technical documentation kits.
Azure and CSPs
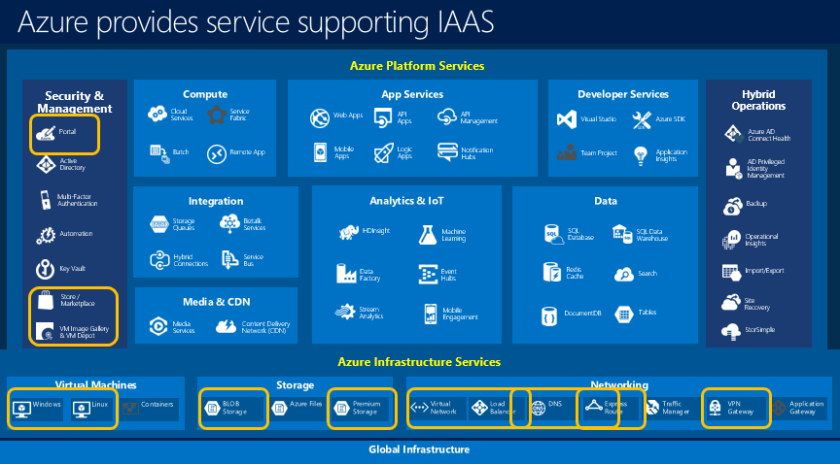
How partners can make money with Azure IaaS
This presentation provides an overview of how partners can make money with Azure IaaS.
N + DV2 VMs are also described (but a very shortly)
Getting started on CSP for Azure
This FAQ style document is a “Getting Started guide” for Microsoft Azure services in the CSP program.
This presentation provides an overview of the Azure in CSP program
Case Studies
Azure CSP partner case study – Dell and Takeform
Azure CSP partner case study – Datapipe
Azure CSP partner case study – Lumen21
Azure CSP partner case study – ProserveIT and BC Milk
Azure CSP partner case study – SaaSplaza
Miscelanneous
Active Directory from on-premises to the cloud – Azure AD whitepapers (it’s clear)
Hybrid IaaS technical guides (hope it’s clear too | tech.guides level 300 are perfect)
This zipped folder includes an overview of Analytics on Azure, including the IoT vision and data platform scenarios
Internet Of Things (IoT) technical documentation
This document provides technical guidance on deploying cloud services for IoT
Application dev/test technical guides
These documents provide a technical overview of application development and testing.
Application dev/test business documentation
This zipped folder contains documents that provide an overview of application dev/test offerings for partners.
This zipped folder provides technical guidance for analytics on Azure
Analytics business documentation
This zipped folder includes an overview of Analytics on Azure, including the Analytics vision and data platform scenarios.
Contoso in the Microsoft Cloud
[PDF, VSD] See how a representative global organization has adopted all of Microsoft’s cloud offerings, including Office 365, Azure, Dynamics 365, and Intune.
SQL Services
Azure SQL DB technical documentation
This zipped folder contains best practices and deployment documentation for Azure SQL database.
Azure SQL DB business documentation
This zipped folder contains presentations that provide guidance on Azure SQL database – business discussions.
SQL in Azure VMs GTM materials
Videos/solution templates
SQL in Azure VMs technical documentation
Best practices and deployment documentation
SQL in Azure VMs business documentation
This zipped folder contains presentations that provide guidance on SQL in Azure VMs – business discussions.
This zipped folder provides technical guidance for deploying Power BI, creating dashboards, and other technical details of managed services.
Power BI business documentation
This presentation provides guidance on incorporating Power BI into your managed services practice through CSP.
RDS 2016 in Azure
RDS 2016 on Azure laaS Technical Guidance Deck
[PPTX] RDS 2016 on Azure IaaS Scenario, Offer and Deployment Approach
RDS 2016 on Azure laaS Technical Guidance Document
[DOC] Great Technical guidance for CSP partners
RDS 2016 on Azure laaS Landing Page Framework
This is the Remote Desktop Services (RDS) 2016 on Azure IaaS Landing Page Framework for HMSPs. Please use the content and modify the format to fit your website template
RDS 2016 on Azure laaS Hoster Partners Messaging Framework
Use this document as a guide as you develop relevant communications. This is a reference document, intended to inform the work of marketing and sales professionals.
RDS 2016 on Azure laaS Sales Datasheet
Explains the value of RDS 2016 on Azure IaaS (DOC)
[PPTX] RDS on Azure Laas BDM Deck
DR and BaaS
Backup and Disaster Recovery technical documentation
These documents provide a technical overview of Backup and Disaster Recovery solutions.
Backup and Disaster Recovery business documentation
This zipped folder contains documents that provides an overview of backup and disaster recovery offerings for partners.
Backup and Disaster Recovery GTM materials
Disaster Recovery for SQL business documentation
This zipped folder contains presentations that provide guidance on disaster recovery for SQL – business discussions.
Disaster Recovery for SQL GTM materials
Campaigns, sample service offers, and templates
Disaster Recovery for SQL technical documentation
This zipped folder contains technical documentation for disaster recovery for SQL, along with a SQL 2014 hybrid kit.
SQL Backup to Azure GTM materials
This zipped folder contains campaigns, sample service offers, and templates for SQL backup to Azure.
SQL Backup to Azure business documentation
This presentation provides guidance on SQL Backup to Azure – business discussions
SQL Backup to Azure technical documentation
Technical deployment kit with deployment guidance of SQL backup to Azure.


